Table of Contents |
guest 2024-05-19 |
Submit Data to Panorama Public
Upload Raw Data
Upload Supplementary Files
Include Subfolders in a Panorama Public Submission
Data Validation for ProteomeXchange
Finding Unimod Matches
Download Data From Panorama Public
Panorama Public
- Submit Data to Panorama Public
- Upload Raw Data
- Upload Supplementary Files
- Include Subfolders in a Panorama Public Submission
- Data Validation for ProteomeXchange
- Finding Unimod Matches
- Download Data From Panorama Public
Tutorial
Submit Data to Panorama Public
PanoramaWeb hosts a public repository called Panorama Public where users may submit supplementary data associated with manuscripts that have been published or are under review. The repository provides a permanent location for data that can be referenced in publications. Users with data in their own projects on PanoramaWeb can follow the instructions below to submit the data to Panorama Public. The PanoramaWeb site administrators will review the submission request and make a copy of the data to Panorama Public. Reviewer account details will be provided to the submitter if the data is for a manuscript undergoing peer review, and the copy on Panorama Public will be kept private until the manuscript is accepted for publication. Data copied to Panorama Public is read-only, ensuring its availability in the original form accepted for publication.
Panorama Public is a member repository of the ProteomeXchange consortium. Data submitted to Panorama Public that fulfills ProteomeXchange submission requirements will be assigned a ProteomeXchange identifier and announced on ProteomeCentral.
Submitting Data to Panorama Public
STEP 1: Upload Skyline documents and other files to a folder on PanoramaWebRefer to the following wiki pages to create a folder in your project on PanoramaWeb and upload Skyline documents and associated data.
STEP 2: Prepare the folder for submission to Panorama PublicFolders containing supplementary data intended for submission to Panorama Public have to be annotated with a description of the experiment. This includes information such as an abstract, experiment and sample descriptions, organism, MS instruments used etc. To add experiment annotations to a folder, do the following: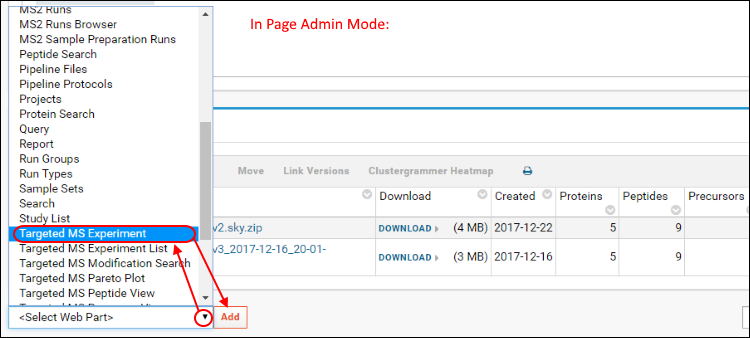

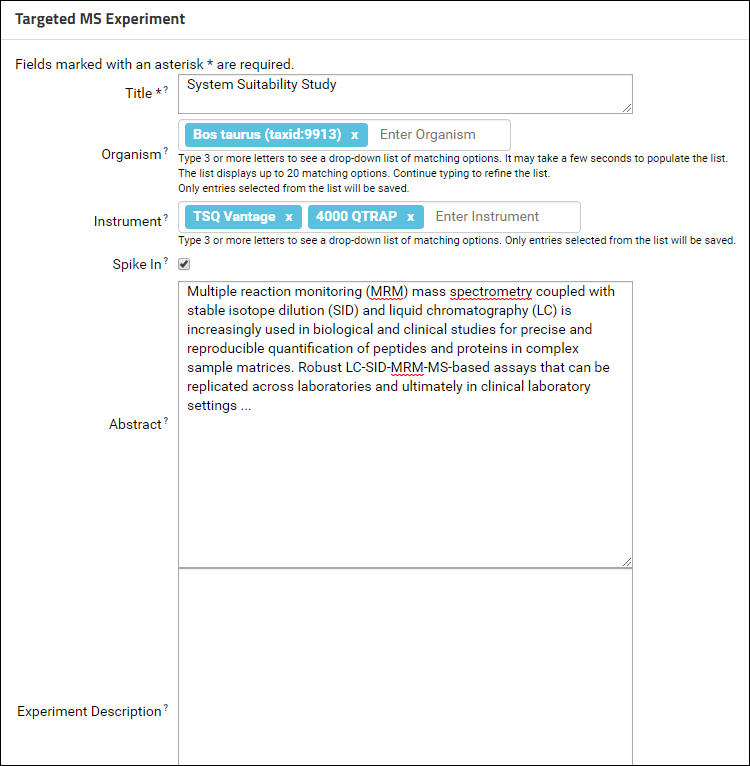
The Instrument and Organism fields are auto-complete fields. Type 3 or more letters to see a drop-down list of matching options. Continue typing to refine the list and select from one of the available options. Contact the Panorama team if you do not see your instrument or organism in the list. At least one organism and one instrument is required for a ProteomeXchange submission.
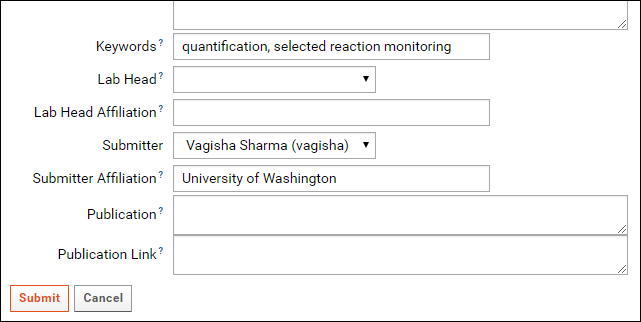
In addition to an organism and an instrument, Keywords describing the data also need to be filled in for a ProteomeXchange submission. Contact details of the data submitter and a lab head are also required. In the Targeted MS Experiment form, the currently logged in user is auto-selected as the submitter. Please fill in the Submitter Affiliation for the submitting user. You can select a lab head from the drop-down menu in the Lab Head field which lists all users that have administrative privileges in the folder. If your lab head does not have an account on the server, you may create one by referring to Adding Users to a Project. If you do not wish to create an account for the lab head you can leave the Lab Head and Lab Head Affiliation fields blank. You will have the option of entering a lab head name and affiliation when you submit the data to Panorama Public.
STEP 3: Submit the annotated folder to Panorama Public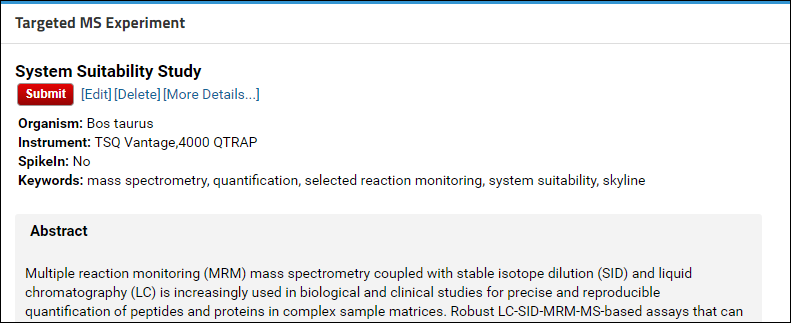
If the Skyline documents in the folder you are submitting contain proteomic data, you will have the option of getting a ProteomeXchange ID for your data. After you click the Submit button you will see a page with a button to validate the data for a ProteomeXchange submission.

Click the Validate Data for ProteomeXchange button to start the data validation process. This process will:
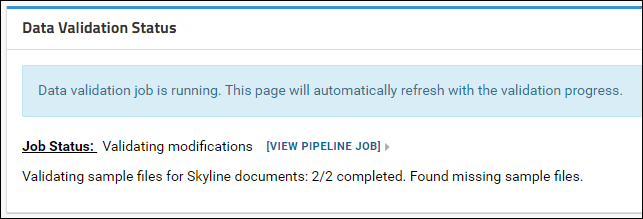
After the validation job is complete a detailed status report is displayed showing the validation status. A summary list of any problems found is included in the main Data Validation Status panel. Details are displayed in the tables below this panel.
If your data is valid for a "complete" ProteomeXchange submission, you can click the Continue Submission button to proceed with the submission. Otherwise, you can try submitting again after you have provided all the missing information. You also have the option of submitting without a ProteomeXchange ID, or continuing with an "incomplete" ProteomeXchange submission.

NOTE: ProteomeXchange IDs can only be assigned to proteomic data. If your Skyline documents do not contain any proteomic targets then you will not be presented with the option to get a ProteomeXchange ID.
After you click the button on the data validation page, you will see a form that looks similar to the one in the image below.
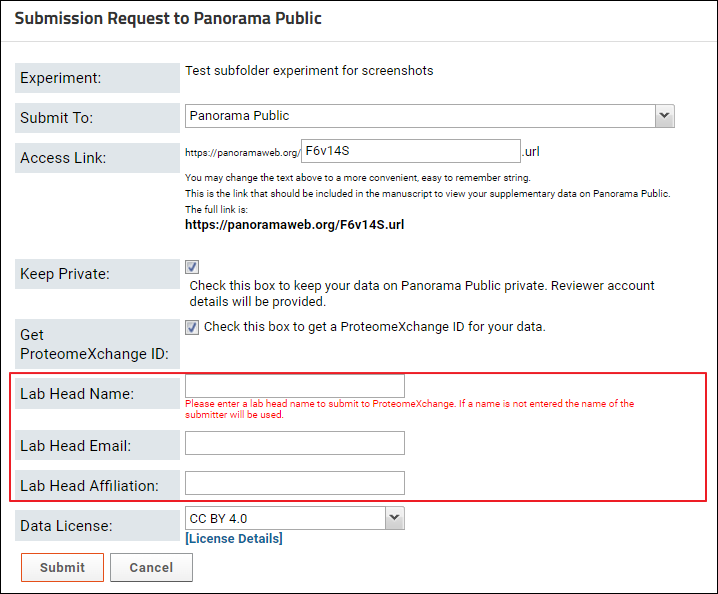
In the Submission Request to Panorama Public form do the following:
The Publish Experiment form allows you to “build” these the access link. The initial part of the link remains constant: https://panoramaweb.org/. You can choose a string to complete the link (highlighted in yellow below).
https://panoramaweb.org/choose_a_string.url
The initial value entered in the Access Link field is a randomly generated alphanumeric string. You can replace it with a convenient, easy to remember string. This string has to be unique across all the experiments published to Panorama Public. You may get an error if the link you entered is already in use for another experiment on Panorama Public. If this happens change the text in the access link field and try again.
Requests to copy data are handled by Panorama Public administrators within a week of submission. Once your data has been successfully copied to Panorama Public you will receive a confirmation email. If you requested that your data on Panorama Public be kept private (e.g. for a manuscript under peer review), the confirmation email will also include reviewer account details. You can pass on the account details to the journal where you are submitting your manuscript. The confirmation email will also include a ProteomeXchange ID unless you opted to skip ProteomeXchange submission.
Once the form is submitted successfully you can go back to the experiment details page.
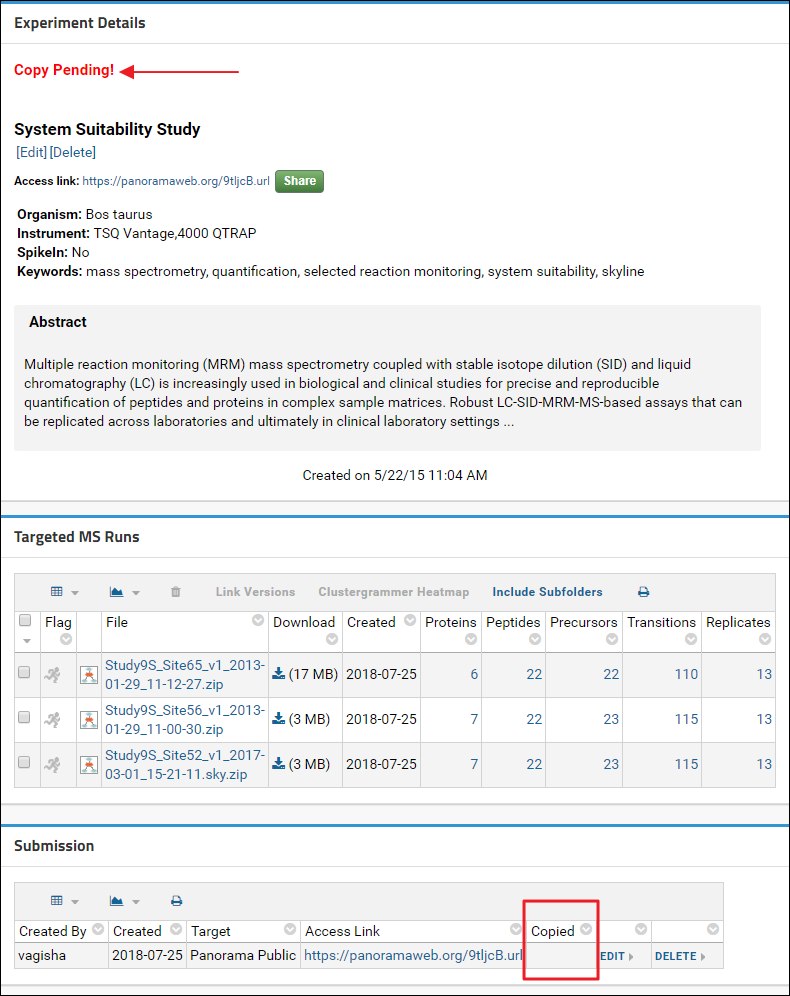
In the Experiment Details box, just above the experiment title, you will see a “Copy Pending!” message. This message will disappear once your data has been copied to Panorama Public. Any changes that you make in the folder, such as adding/removing Skyline documents or wiki pages, or changing the layout of the page will also get copied when a copy is made to Panorama Public. At the bottom of the page, in the Submission table, you will see the Access Link that you created for this experiment. The Copied column will be blank until a copy has been made successfully. Once the data has been copied this column will display the date when the data was copied. And at that point if you click the Access Link you will be taken to the location on Panorama Public where your data was copied. You can verify that the data, folder layout and views were copied accurately.
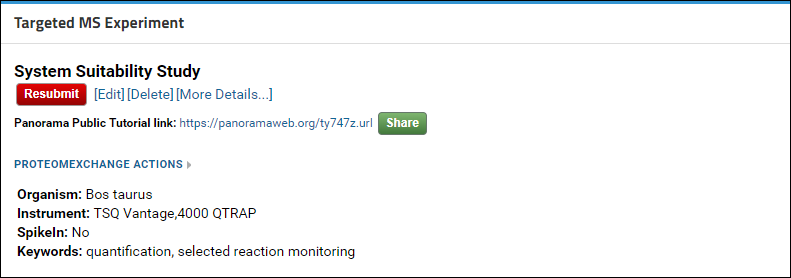
If you need to make any changes to your data (e.g. to address reviewer feedback) after it has been copied to Panorama Public you can make the changes in your own folder. When you are ready click the red Resubmit button in the Targeted MS Experiment web part. This will send a request to the Panorama Public administrators to delete the old copy and make a new copy of your data to Panorama Public. Your access link will remain unchanged.
Related Resources:
Panorama Public is a member repository of the ProteomeXchange consortium. Data submitted to Panorama Public that fulfills ProteomeXchange submission requirements will be assigned a ProteomeXchange identifier and announced on ProteomeCentral.
Submitting Data to Panorama Public
- Step 1: Upload Skyline documents and other files to a folder on PanoramaWeb
- Step 2: Prepare the folder for submission to Panorama Public
- Step 3: Submit the annotated folder to Panorama Public
STEP 1: Upload Skyline documents and other files to a folder on PanoramaWebRefer to the following wiki pages to create a folder in your project on PanoramaWeb and upload Skyline documents and associated data.
- Create a folder in Panorama
- Import Skyline documents to a folder in Panorama
- Upload raw data associated with the Skyline documents. This is a requirement for ProteomeXchange.
- Upload supplementary files
STEP 2: Prepare the folder for submission to Panorama PublicFolders containing supplementary data intended for submission to Panorama Public have to be annotated with a description of the experiment. This includes information such as an abstract, experiment and sample descriptions, organism, MS instruments used etc. To add experiment annotations to a folder, do the following:
- Go to the home page of the folder by navigating the folder menu under the Panorama logo (Folder Navigation).
- Click the gear icon in the top right corner of the page, then select Page Admin Mode from the drop-down menu.
- Scroll to the bottom of the page and select Targeted MS Experiment from the <Select Web Part> menu at the bottom-left of the page.

- Click the Add button. This action will add a web part titled Targeted MS Experiment at the bottom of the page that looks like this:

- Click the Create New Experiment link in the Targeted MS Experiment web part.
- Fill out the Targeted MS Experiment form.

The Instrument and Organism fields are auto-complete fields. Type 3 or more letters to see a drop-down list of matching options. Continue typing to refine the list and select from one of the available options. Contact the Panorama team if you do not see your instrument or organism in the list. At least one organism and one instrument is required for a ProteomeXchange submission.
In addition to an organism and an instrument, Keywords describing the data also need to be filled in for a ProteomeXchange submission. Contact details of the data submitter and a lab head are also required. In the Targeted MS Experiment form, the currently logged in user is auto-selected as the submitter. Please fill in the Submitter Affiliation for the submitting user. You can select a lab head from the drop-down menu in the Lab Head field which lists all users that have administrative privileges in the folder. If your lab head does not have an account on the server, you may create one by referring to Adding Users to a Project. If you do not wish to create an account for the lab head you can leave the Lab Head and Lab Head Affiliation fields blank. You will have the option of entering a lab head name and affiliation when you submit the data to Panorama Public.

- Click the Submit button at the bottom of the form.

STEP 3: Submit the annotated folder to Panorama Public
- Navigate back to the folder home page by clicking on the link with the icon and folder name near the top of the page.
- Scroll down, if you need to, so that you can see the Targeted MS Experiment web part.
- Click the red Submit button in the Targeted MS Experiment web part.

If the Skyline documents in the folder you are submitting contain proteomic data, you will have the option of getting a ProteomeXchange ID for your data. After you click the Submit button you will see a page with a button to validate the data for a ProteomeXchange submission.

Click the Validate Data for ProteomeXchange button to start the data validation process. This process will:
- Verify that all the raw data files imported into your Skyline documents have been uploaded
- All the modifications used in your Skyline documents have a Unimod Id
- The source files (raw data + search results) used to build the spectral libraries used in your documents have been uploaded.

After the validation job is complete a detailed status report is displayed showing the validation status. A summary list of any problems found is included in the main Data Validation Status panel. Details are displayed in the tables below this panel.
View Data Validation for ProteomeXchange for more details.
If your data is valid for a "complete" ProteomeXchange submission, you can click the Continue Submission button to proceed with the submission. Otherwise, you can try submitting again after you have provided all the missing information. You also have the option of submitting without a ProteomeXchange ID, or continuing with an "incomplete" ProteomeXchange submission.

NOTE: ProteomeXchange IDs can only be assigned to proteomic data. If your Skyline documents do not contain any proteomic targets then you will not be presented with the option to get a ProteomeXchange ID.
After you click the button on the data validation page, you will see a form that looks similar to the one in the image below.
- The Get ProteomeXchange ID checkbox will be displayed only if the data is valid for a "complete" or "incomplete" ProteomeXchange submission.
- If you did not enter a lab head in the Targeted MS Experiment form, you will be able to enter the lab head details in the submission form. If you do not fill in the lab head details in this form, the submitting user's information will be used in the lab head field when announcing the data to ProteomeXchange.

In the Submission Request to Panorama Public form do the following:
- Select “Panorama Public” from the drop-down list next to the Submit To option, if it is not already selected
- Enter an Access Link
- If you are submitting data for a manuscript undergoing peer review leave the Keep Private box checked. This will ensure that when the data is copied to Panorama Public, it will be kept private with read-only access to the submitter. A read-only reviewer account will be created for the data, and account details provided to the submitter. The account details can be conveyed to the journal where the manuscript is submitted. If you want your data to be publicly available on Panorama Public right away uncheck the Keep Private checkbox.
- Click the Submit button
The Publish Experiment form allows you to “build” these the access link. The initial part of the link remains constant: https://panoramaweb.org/. You can choose a string to complete the link (highlighted in yellow below).
https://panoramaweb.org/choose_a_string.url
The initial value entered in the Access Link field is a randomly generated alphanumeric string. You can replace it with a convenient, easy to remember string. This string has to be unique across all the experiments published to Panorama Public. You may get an error if the link you entered is already in use for another experiment on Panorama Public. If this happens change the text in the access link field and try again.
Requests to copy data are handled by Panorama Public administrators within a week of submission. Once your data has been successfully copied to Panorama Public you will receive a confirmation email. If you requested that your data on Panorama Public be kept private (e.g. for a manuscript under peer review), the confirmation email will also include reviewer account details. You can pass on the account details to the journal where you are submitting your manuscript. The confirmation email will also include a ProteomeXchange ID unless you opted to skip ProteomeXchange submission.
Once the form is submitted successfully you can go back to the experiment details page.
In the Experiment Details box, just above the experiment title, you will see a “Copy Pending!” message. This message will disappear once your data has been copied to Panorama Public. Any changes that you make in the folder, such as adding/removing Skyline documents or wiki pages, or changing the layout of the page will also get copied when a copy is made to Panorama Public. At the bottom of the page, in the Submission table, you will see the Access Link that you created for this experiment. The Copied column will be blank until a copy has been made successfully. Once the data has been copied this column will display the date when the data was copied. And at that point if you click the Access Link you will be taken to the location on Panorama Public where your data was copied. You can verify that the data, folder layout and views were copied accurately.

If you need to make any changes to your data (e.g. to address reviewer feedback) after it has been copied to Panorama Public you can make the changes in your own folder. When you are ready click the red Resubmit button in the Targeted MS Experiment web part. This will send a request to the Panorama Public administrators to delete the old copy and make a new copy of your data to Panorama Public. Your access link will remain unchanged.

Related Resources:
- Panorama Public: A public repository for Skyline documents (ASMS 2015 poster)
- Submitting Supplementary Data to Panorama Public (A detailed tutorial that covers a broader set of Panorama features)
Upload Raw Data
- Upload raw data in a web browser
- Organizing data in folders
- Upload raw data by mapping a network drive in Windows
- Upload raw data on the command line
- What to do if the Raw Data tab is missing or has an error
Upload raw data in a web-browser
Raw data associated with Skyline documents in a folder can be uploaded via the Raw Data tab in the top right corner.(NOTE: If you don't see a Raw Data tab click here for instructions on how to add it)
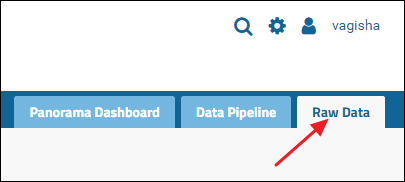
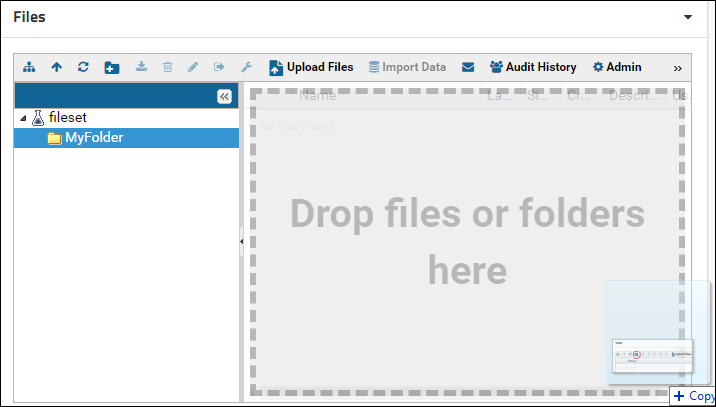
Click the tab to see a Files browser. You can drag-and-drop files and/or folders located on your computer onto the Files browser as shown in the image below.

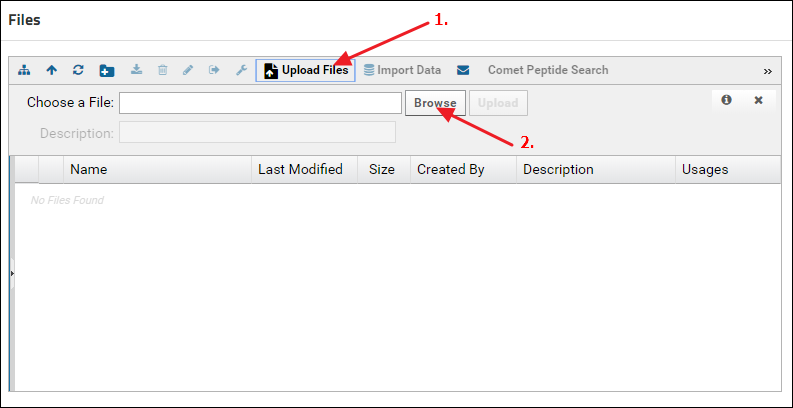
Another way to upload files is to click the Upload Files button in the Files browser, and click Browse to navigate to and select the file you want to upload.
Organizing data in folders
Raw data files can be organized in folders. Create a new folder by clicking the new folder button in the Files webpart.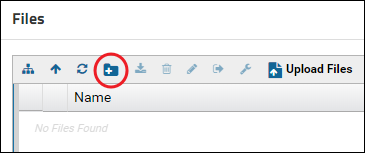
Enter a name for the folder and click Submit.

Click the Show or Hide Folder Tree button to show the folder tree panel.
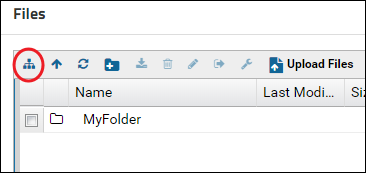
Click the newly created folder in the folder tree panel to select it. The right panel will update to show the contents of the selected folder. Drag-and-drop files in the right panel to upload them to the new folder.
More information on using the Files browser can be found here: Using the Files Repository
Upload raw data by mapping a network drive in Windows
On a Windows machine you can map your PanoramaWeb folder as a network drive and copy files to the folder using Windows Explorer. This uses WebDAV for file transfer, and Windows XP and later have a built-in WebDAV client.NOTE: The instructions below will work on Windows 10 and Windows Server 2016. If you have an older operating system and are unable to map a network drive with these steps then you can use a third party WebDAV client such as Cyberduck. Look at this page for instructions on setting up Cyberduck and for a list of other WebDAV clients: Example Setup for Cyberduck WebDAV Client
To map a PanoramaWeb raw data folder as a Windows network drive follow these steps:
Get the WebDAV URL
- In a web-browser navigate to the Panorama folder and click the Raw Data tab
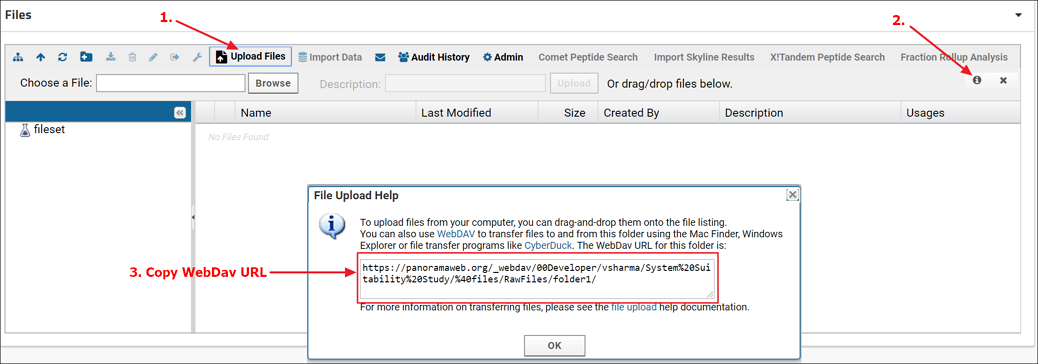
- Click the Upload Files button in the Files webpart (1. in the screenshot below)
- Click the "Upload file" icon (2. in the screenshot below).
- From the File Upload Help dialog copy the WebDav URL (3. in the screenshot below)
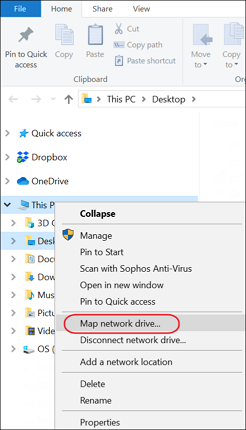
- On your computer open Windows Explorer. Right-click This PC in the left pane and select Map network drive from the menu
- In the Map network drive dialog enter the WebDav URL that you copied from your Panorama folder. Check Connect using different credentials and click Finish
- You will be prompted for a username and password. Enter your PanoramaWeb email address and password and click OK
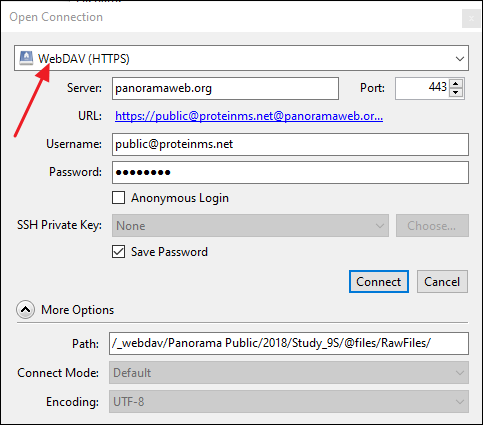
Using Cyberduck (https://cyberduck.io/)
- Click Open Connection.

- In the Open Connection dialog select WebDAV (HTTPS) as the connection type.
- Get the WebDAV URL as described above and enter it in the Server field. CyberDuck will automatically parse the URL and populate the Path field.
- In the Username field enter your email address on PanoramaWeb.
- Enter you password in the Password field.
- Click Connect.
Upload raw data on the command line
If you are comfortable using the command line, you can use rclone to upload your raw files. Rclone is a command line utility to sync files to and from the cloud. Among the many cloud providers it can sync with, one is webdav. Webdav can be used to access files on PanoramaWeb.You can download rclone from https://rclone.org/downloads/. If you are on Windows I recommend that you download the `AMD64 - 64bit` version.The first step is find WebDav URL
- In a web-browser navigate to the Panorama folder and click the Raw Data tab
- Click the Upload Files button in the Files webpart (1. in the screenshot below)
- Click the "Upload file" icon (2. in the screenshot below).
- From the File Upload Help dialog copy the WebDav URL (3. in the screenshot below)

Setup a remote for your folder on Panoramaweb
Start the interactive configuration sessionrclone.exe config edit
No remotes found - make a new one
n) New remote
s) Set configuration password
q) Quit config
n/s/q> n
name> PanoramaWebFiles
Type of storage to configure.
Enter a string value. Press Enter for the default ("").
Choose a number from below, or type in your own value
 1 / 1Fichier
    "fichier"
 2 / Alias for an existing remote
    "alias"
 3 / Amazon Drive
    "amazon cloud drive"
...
33 / Webdav
    "webdav"
34 / Yandex Disk
    "yandex"
35 / http Connection
    "http"
36 / premiumize.me
    "premiumizeme"
Storage>  33
URL of http host to connect to
Enter a string value. Press Enter for the default ("").
Choose a number from below, or type in your own value
 1 / Connect to example.com
    "https://example.com"
url> https://panoramaweb.org/_webdav/ExampleProject/Folder/@files/
Name of the Webdav site/service/software you are using
Enter a string value. Press Enter for the default ("").
Choose a number from below, or type in your own value
 1 / Nextcloud
    "nextcloud"
 2 / Owncloud
    "owncloud"
 3 / Sharepoint
    "sharepoint"
 4 / Other site/service or software
    "other"
vendor> other
User name
Enter a string value. Press Enter for the default ("").
user> bconn@proteinms.net
Password.
y) Yes type in my own password
g) Generate random password
n) No leave this optional password blank (default)
y/g/n> y
y/g/n> y
Enter the password:
password:
Confirm the password:
password:
Bearer token instead of user/pass (eg a Macaroon)
Enter a string value. Press Enter for the default ("").
bearer_token>
Edit advanced config? (y/n)
y) Yes
n) No (default)
y/n> n
Remote config
--------------------
"missing" href="/home/wiki-page.view?name=PanoramaWebFiles">PanoramaWebFiles
type = webdav
url = https://panoramaweb.org/_webdav/ExampleProject/Folder/@files/
vendor = other
user = bconn@proteinms.net
--------------------
y) Yes this is OK (default)
e) Edit this remote
d) Delete this remote
y/e/d> yes
y/e/d> y
Current remotes:

Name                 Type
====                 ====
PanoramaWebFiles webdav

e) Edit existing remote
n) New remote
d) Delete remote
r) Rename remote
c) Copy remote
s) Set configuration password
q) Quit config
e/n/d/r/c/s/q> q
Copying files
To copy a file to PanoramaWeb, you can use the commandrclone.exe --progress copy FILENAME PanoramaWebFiles:
rclone.exe --progress copy DIRECTORY_TO_COPY PanoramaWebFiles:
What to do if the Raw Data tab is missing or has an error
The Raw Data tab is added by default when you create a new "Panorama" type folder. Some older folders may not have this tab. If you do not see the Raw Data in a "Panorama" type folder, and you are the administrator of the folder, you can add it as follows:- Click the gear icon in the top right corner
- Select Add Raw Data Tab from the drop-down menu
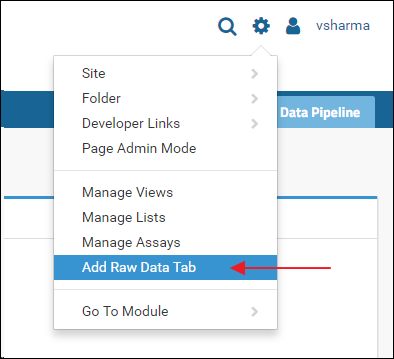
The Raw Data tab provides a view into a "RawFiles" directory on the server's file system. If the "RawFiles" directory is somehow deleted you will see an error when you click the Raw Data tab.
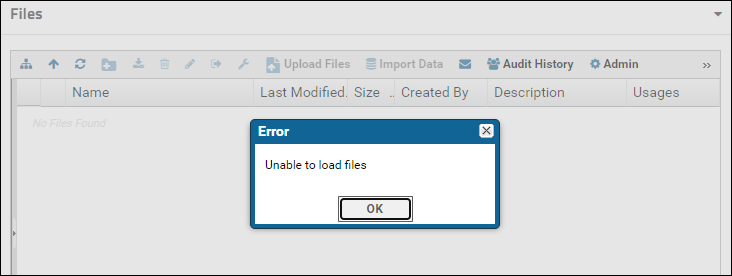
If you see the error message above or something like "File root directory configured for this webpart could not be found", first remove the Raw Data tab and then add it back. To remove the tab:
- If you are not in page admin mode, click the gear icon in the top right corner and select Page Admin Mode from the menu
- Click the Raw Data tab and click OK in the Error dialog
- Click the little triangle in the right corner of the tab to access the control menu and select Delete
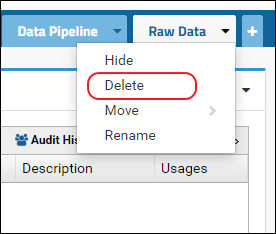
After this follow the steps above to add the Raw Data tab. This will create the "RawFiles" directory on the file system.
Upload Supplementary Files
The Files webpart or the file browser in Panorama can be used to upload any additional supplementary files that you may want to make available with your data on Panorama Public. To add a Files webpart
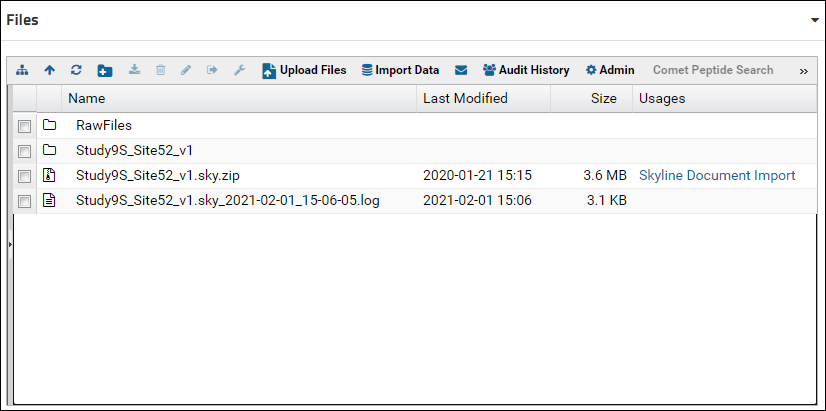
In the file browser you will see a "RawFiles" folder. This folder is automatically created for every "Panorama" type folder. This is the folder where raw files associated with Skyline documents should be uploaded. The Raw Data tab provides a view into this folder. Look at [Upload Raw Data] for more details. In the file browser you should also see the Skyline documents (.sky.zip files) that were uploaded to the folder. For each Skyline document where will be an exploded directory (containing the .sky, .skyd etc. files), as well as a log file that was created when the document was imported.
Files and folders can be uploaded by selecting them on your computer and then dragging and dropping them on top of the file browser. It may be a little hard for viewers to locate supplementary files in the default view of the file browser if there are multiple Skyline documents uploaded to the folder. To provide a cleaner view, you can create a sub-folder for supplementary files and customize the file browser to display only the contents of that folder. A new folder can be created by clicking the "Create a new folder" button in the tool bar of the file browser as shown below. You can name the folder whatever you like. Here it is named "SupplementaryFiles".

Double click the new folder to open it. Alternatively, click the "Show or hide the folder tree" icon in the toolbar to split the file browser into two panels. The left panel shows an expandable tree view of the folder structure, and the right panel displays the contents of the folder selected in the left panel. Select the folder just created (e.g. "SupplementaryFiles") and drag and drop files on top of the right panel to add files to this folder.
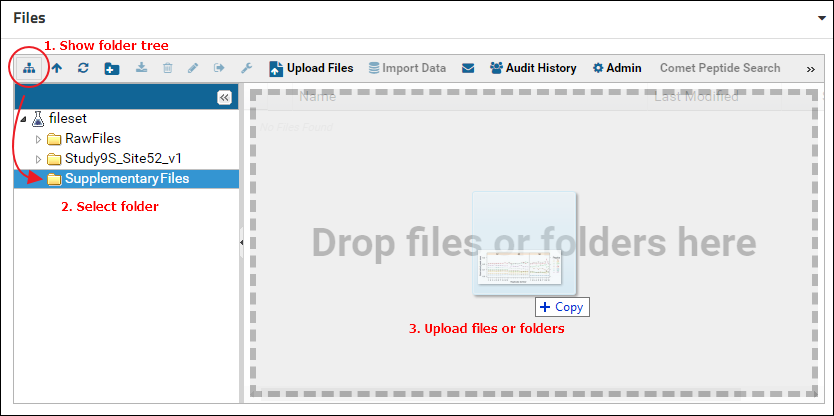
Next, customize the Files webpart to display only the contents of the "SupplementaryFiles" folder. To do this:
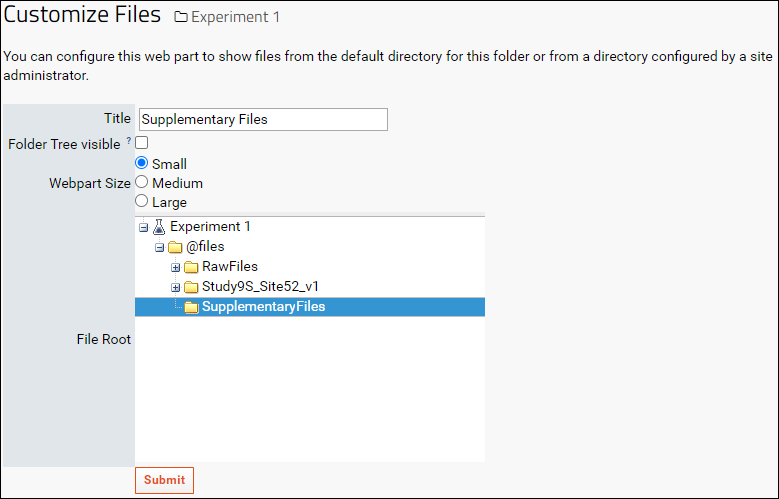
The file browser will now show the contents of the "SupplementaryFiles" folder. More than one Files webpart can be added to a folder page and each one can have different customization settings.

To add a new tab: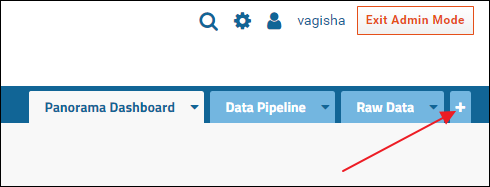
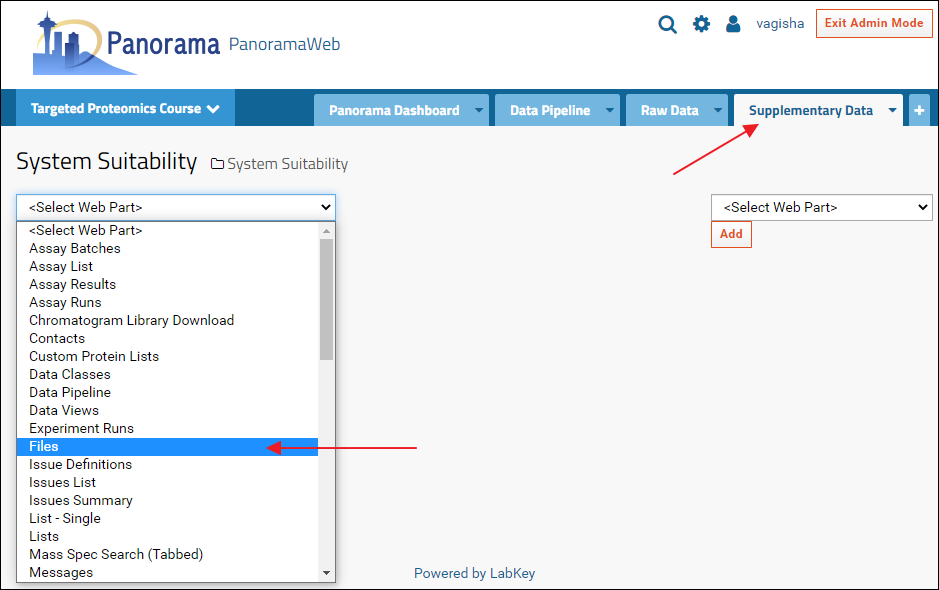
A Files webpart can now be added to the new "Supplementary Data" tab by selecting "Files" from the <Select Web Part> menu. The files browser can be configured, as described above, to show the contents of the folder that has the supplementary data files.
- Click the gear icon in the top right corner and select Page Admin Mode from the menu
- Scroll to the bottom of the page and select Files from the <Select Web Part> menu at the bottom-left of the page
- Click the Add button

In the file browser you will see a "RawFiles" folder. This folder is automatically created for every "Panorama" type folder. This is the folder where raw files associated with Skyline documents should be uploaded. The Raw Data tab provides a view into this folder. Look at [Upload Raw Data] for more details. In the file browser you should also see the Skyline documents (.sky.zip files) that were uploaded to the folder. For each Skyline document where will be an exploded directory (containing the .sky, .skyd etc. files), as well as a log file that was created when the document was imported.
Files and folders can be uploaded by selecting them on your computer and then dragging and dropping them on top of the file browser. It may be a little hard for viewers to locate supplementary files in the default view of the file browser if there are multiple Skyline documents uploaded to the folder. To provide a cleaner view, you can create a sub-folder for supplementary files and customize the file browser to display only the contents of that folder. A new folder can be created by clicking the "Create a new folder" button in the tool bar of the file browser as shown below. You can name the folder whatever you like. Here it is named "SupplementaryFiles".

Double click the new folder to open it. Alternatively, click the "Show or hide the folder tree" icon in the toolbar to split the file browser into two panels. The left panel shows an expandable tree view of the folder structure, and the right panel displays the contents of the folder selected in the left panel. Select the folder just created (e.g. "SupplementaryFiles") and drag and drop files on top of the right panel to add files to this folder.

Next, customize the Files webpart to display only the contents of the "SupplementaryFiles" folder. To do this:
- Click the little triangle in the top right corner of the Files webpart and select Customize from the control menu

- In the Customize Files form enter a name in the Title field
- Select the "SupplementaryFiles" folder in the File Root tree
- Click Submit

The file browser will now show the contents of the "SupplementaryFiles" folder. More than one Files webpart can be added to a folder page and each one can have different customization settings.

Adding a new tab for supplementary files
The Files webpart can also be added to a new tab on the page, like the Raw Data tab. To add a new tab first make sure you are in the Page Admin mode. If you are, you will see an Exit Admin Mode button in the top right corner of the browser window. If you don't see the button, do this to enter Page Admin mode:- Click the gear icon in the top right corner and select Page Admin Mode from the menu
To add a new tab:
- Click the "+" icon to the right of the Raw Data tab

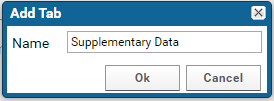
- Enter "Supplementary Data" in the Add Tab form, and click OK

A Files webpart can now be added to the new "Supplementary Data" tab by selecting "Files" from the <Select Web Part> menu. The files browser can be configured, as described above, to show the contents of the folder that has the supplementary data files.

Include Subfolders in a Panorama Public Submission
Data submitted to Panorama Public can be organized in subfolders. If you submit a folder to Panorama Public that has subfolders, you will be asked to confirm that you want to include subfolders in your submission request.
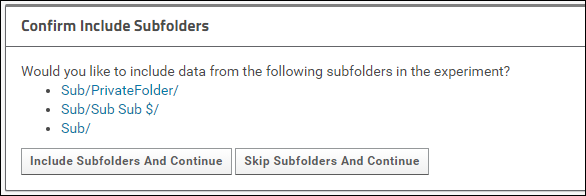
Click Include Subfolders And Continue to configure the experiment to include subfolders.
Click Skip Subfolders and Continue if you do not want to include any of the subfolders. When you choose this option only the contents of the main folder will be copied to Panorama Public.
To include subfolders in a submission request the user must have read permissions in all the subfolders. If you do not have read permissions in one or more of the subfolders you will this following message.

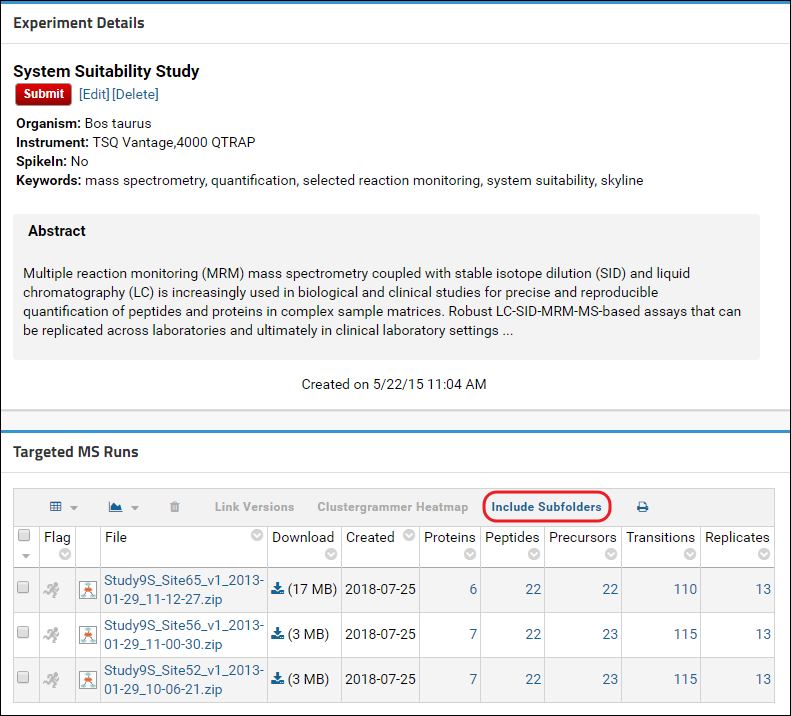
You can also configure a folder to include (or exclude) subfolders prior to submitting. To do this, click the [More Details] link in the Targeted MS Experiments webpart to go to the experiment details page. On this page you will see a panel titled Subfolders if there are subfolders.

Click the Include Subfolders button to configure the experiment to include subfolders. The page will refresh and you will see a list of all the subfolders that are included in the experiment. These subfolders will be copied to Panorama Public when the data is submitted.


Click Include Subfolders And Continue to configure the experiment to include subfolders.
Click Skip Subfolders and Continue if you do not want to include any of the subfolders. When you choose this option only the contents of the main folder will be copied to Panorama Public.
To include subfolders in a submission request the user must have read permissions in all the subfolders. If you do not have read permissions in one or more of the subfolders you will this following message.


Click the Include Subfolders button to configure the experiment to include subfolders. The page will refresh and you will see a list of all the subfolders that are included in the experiment. These subfolders will be copied to Panorama Public when the data is submitted.

Data Validation for ProteomeXchange
Proteomic datasets submitted to Panorama Public can be assigned a ProteomeXchange ID if they fulfill the ProteomeXchange data guidelines. To get a ProteomeXchange ID all the raw data files imported into the Skyline documents must be uploaded. This is the minimum requirement for getting a ProteomeXchange ID. See Upload Raw Data for details on how to upload raw data. In addition to the raw data the following are also required for a "complete" ProteomeXchange submission:
- All modifications used in the Skyline documents must have Unimod Ids
- If the Skyline documents include spectral libraries then all the source files (raw + search results) used to build the libraries must be uploaded
When a dataset is submitted, it is validated for a ProteomeXchange submission. The validation process runs as a pipeline job, and the results are displayed after the job is complete. The summary panel at the top of the page displays the validation status and any problems that were found during data validation.

You will see this status message if the data is valid for a "complete" ProteomeXchange submission. This means:
- All the raw data files used with the Skyline documents were uploaded
- All the modifications used with the Skyline documents had Unimod Ids OR there were no modifications
- The source files (spectrum files + search results files) used to build the spectral libraries were uploaded OR there were no spectral libraries

You will see this status message if
- All the raw data files used with the Skyline documents were uploaded
- BUT, one or more modifications in the Skyline documents did not have a Unimod Id OR the source files used to build one or more spectral libraries were not uploaded

You will see this status message if one more raw files used with the Skyline documents were not uploaded. The data cannot be assigned a ProteomeXchange ID but it can still be submitted to Panorama Public by clicking the Submit Without a ProteomeXchange ID button.
Validation details for Skyline documents (sample files), modifications and spectral libraries are displayed in the tables below the validation summary panel.
Sample file validation table
The Skyline Document Sample Files table displays the status for each Skyline document in the dataset. If all the raw data files imported into the document were uploaded, the status displayed is Complete. Otherwise, the status displayed is Incomplete.
The nodes in the table can be expanded to view the list of replicates and sample files in each document.

Modifications validation table
The Modifications table displays a list of modifications found in the Skyline documents. For a "complete" ProteomeXchange submission all the modifications must have a Unimod Id. Skyline supports an extensive set of Unimod modifications, and it is recommended that you use modifications from the built-in list of Unimod modifications rather than define your own custom modifications. If you are unable to find your desired modification in Skyline then please post to the Skyline or Panorama support boards.The modifications table will display Missing in the Unimod Match column if the modification in the Skyline document did not have a Unimod Id. Otherwise, the Unimod Id is displayed. Clicking on a Unimod Id will take you to the modification page on the Unimod website.

Expand the nodes by clicking the '+' icon in the first column to view the Skyline documents in the dataset that use the modification along with a link to the peptides in the document with the modification.
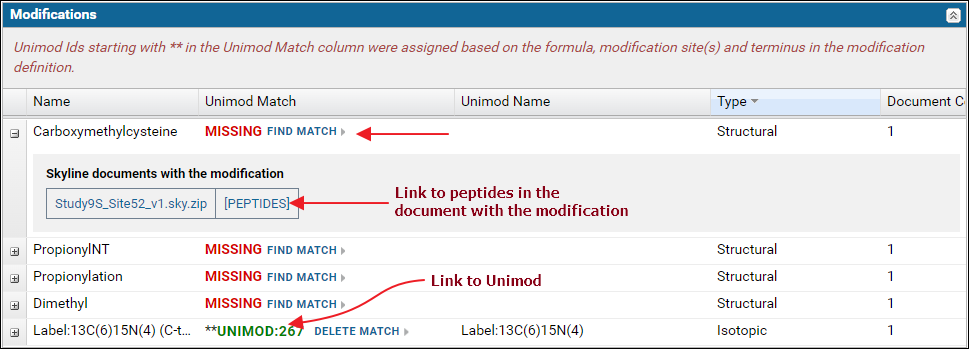
If any of the modifications did not have a Unimod Id you can click the Find Match link. This will attempt to find a Unimod match for the modification based on the modification formula and the modified amino acids and / or terminus information found in the modification definition in the Skyline document. Read more about finding Unimod matches on this page: Finding Unimod Matches.
Spectral library validation table
The Spectral Libraries table has a row for each spectral library used with the Skyline documents in the dataset. The library status, in the Status column is Complete if the library is supported and all the source files used to build the library were uploaded. Otherwise the status is Incomplete. Each row can be expanded by clicking the '+' icon in the first column to view a list of source files for the library along with links to Skyline documents that use the library.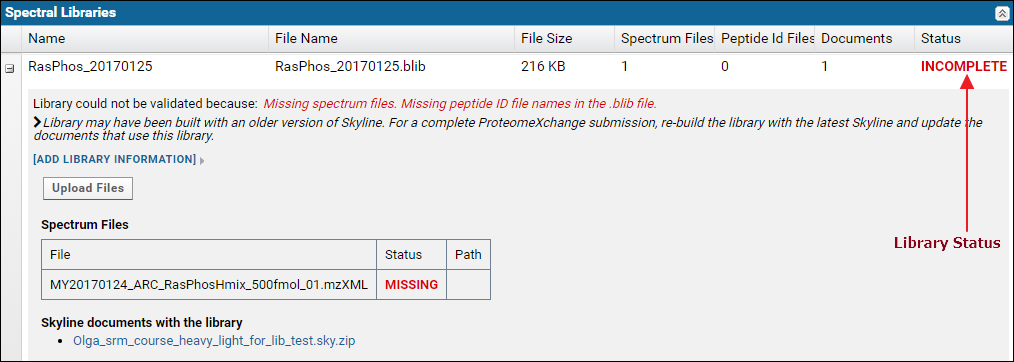
Finding Unimod Matches
For a “complete” ProteomeXchange submission all the modifications used in the submitted Skyline documents are required to have a Unimod Id. Without Unimod Ids, the data can still be assigned a ProteomeXchange ID, but the data will be annotated as "supported by repository but incomplete data and/or metadata" when it is announced to ProteomeXchange.
View Data Validation for ProteomeXchange for more details.
Skyline supports an extensive set of Unimod modifications, and it is recommended that you use modifications from Skyline's built-in list of modifications rather than define your own custom modifications. If you are unable to find your desired modification in Skyline, please post to the Skyline or Panorama support boards.
The sections below cover the following:
If a modification is not associated with a Unimod Id, you will see a Find Match link for the modification in two locations:


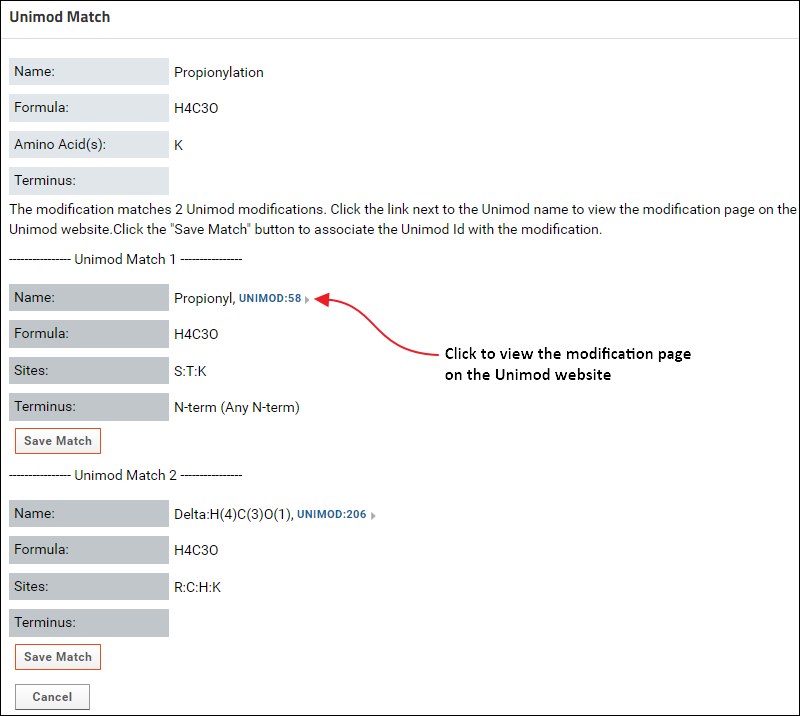
If more than one match was found, click the Save Match button below the correct match to associate the Unimod Id with the modification.

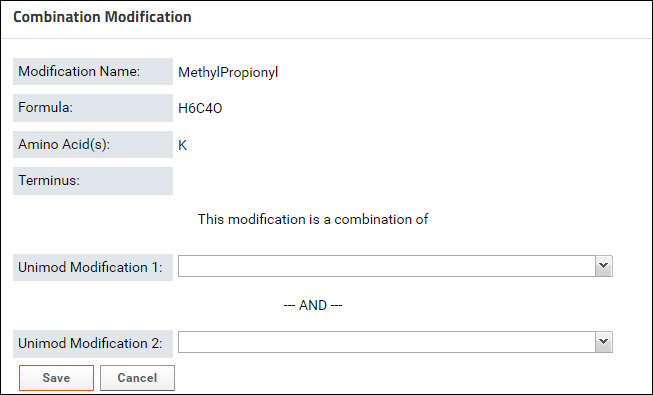

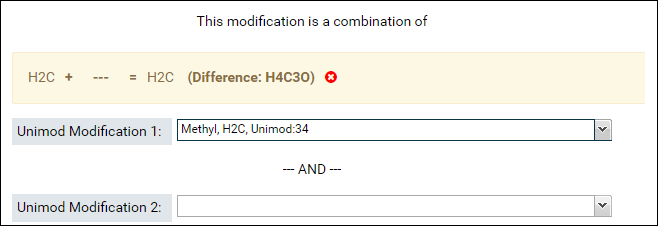
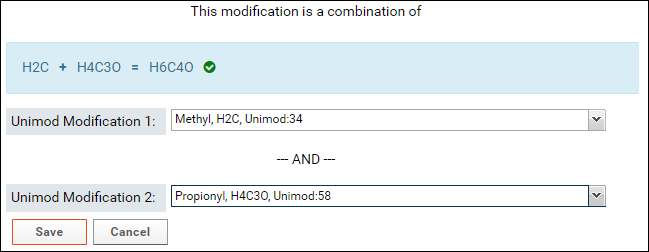
If the sum of the formulas of the two selected modifications matches the formula of the combination modification then a green checkmark will be displayed as shown in the image above.
The screenshot below shows a saved combination modification in the Modifications table on the data validation results page:

Clicking the Unimod Ids will link to the modification page on the Unimod website

View Data Validation for ProteomeXchange for more details.
Skyline supports an extensive set of Unimod modifications, and it is recommended that you use modifications from Skyline's built-in list of modifications rather than define your own custom modifications. If you are unable to find your desired modification in Skyline, please post to the Skyline or Panorama support boards.
The sections below cover the following:
If a modification is not associated with a Unimod Id, you will see a Find Match link for the modification in two locations:
- If you have already run ProteomeXchange data validation on the data, and are looking at the validation results, you will see the Find Match link in the Unimod Match column of the Modifications table.

- Another location where you will see the Find Match link is on the experiment details page in the Structural Modifications and Isotope Modifications tables. These tables list the structural and isotope modifications used in the dataset. You can go to the experiment details page by clicking the [More Details...] link in the Targeted MS Experiment webpart.

Assign a Unimod match
It is highly recommended that you use a modification from Skyline's built-in list of structural and isotope modifications, since those modifications have a Unimod Id. However, if there are custom modifications in your documents that do not have a Unimod Id, you can find a Unimod match for those modifications on Panorama if the modification definition has a modification formula (or labeled atoms for isotope modifications), the modified sites (amino acids) and / or the modified terminus. To find a Unimod match do the following:- Click the Find Match link in one of tables (Modifications table on the data validation results page, or one of the modifications table on the experiment details page). If you click this link for a structural modification you will see a page with buttons to find a Unimod Match or define a Combination Modification. Click the button to find a Unimod Match. This will display a page that shows the Unimod matches found for the modification based on the modification formula and modification sites (amino acids) and / or modified terminus. The option to define a combination modification is not available for Isotope modifications, so clicking the Find Match link will open the page with Unimod matches found for the modification.

If more than one match was found, click the Save Match button below the correct match to associate the Unimod Id with the modification.
Define a combination modification
Sometimes users have to create a custom modification in Skyline that is the combination of two modifications. Such modifications do not have a Unimod Id in the Skyline document. To associate a combination modification with the Unimod Ids of the two modifications that it combines, you can do the following:- Click the Find Match link in one of tables (Modifications table on the data validation results page, or the Structural Modifications table on the experiment details page). You will see the following page:

- Click the button to define a Combination Modification. You will see a form where you can select two Unimod modifications that make up the modification.

- Start typing the name of first modification in the textbox for Unimod Modification 1. The drop-down list will show you the modifications that match the text entered. Select a modification from the list.

- The sum of the formulas of the two modifications you select must match the formula of combination modification. After you select the first modification, the form will update to show the difference in the formula of the combination modification and the selected modification.

- Select the second modification in Unimod Modification 2. You can search for the modification by name or by the difference in the formula that is displayed in the form (e.g. H4C3O in the image above)

If the sum of the formulas of the two selected modifications matches the formula of the combination modification then a green checkmark will be displayed as shown in the image above.
- Click the Save button.
The screenshot below shows a saved combination modification in the Modifications table on the data validation results page:

Clicking the Unimod Ids will link to the modification page on the Unimod website
Wildcard modifications in Skyline
Skyline includes the following built-in wildcard modifications.- Label:15N
- Label:13C
- Label:13C15N

Download Data From Panorama Public
- Download Skyline documents
- Download raw data
Download Skyline documents
Skyline documents available in a public dataset can be downloaded by clicking the download icon ( ) next to the document name. In the pop-up menu click Full Skyline Document. This will download a .sky.zip file which can be opened in Skyline.
Download raw data in a web-browser
Raw data uploaded with a dataset is available under the Raw Data tab in the top right corner. Click the tab to view a list of files available for downloading. Select one or more files and click the download icon ( ).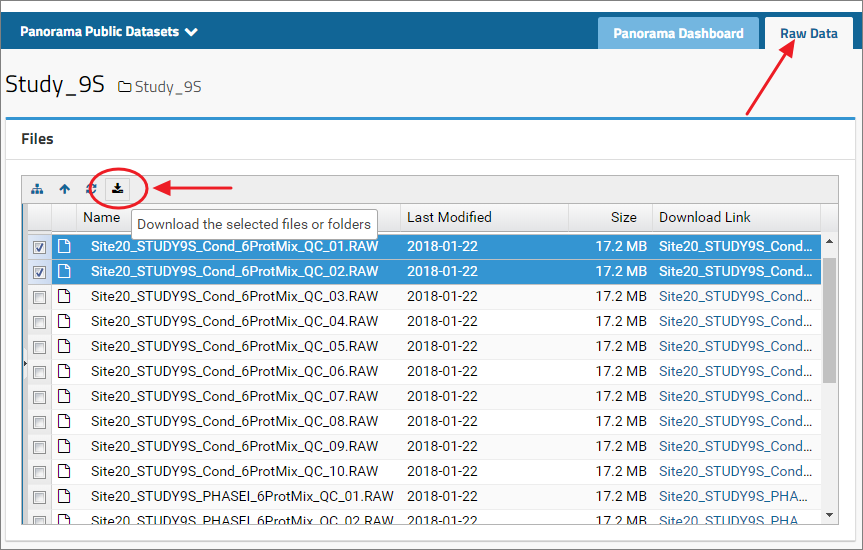
To select all the files listed in the files browser, select the first file in the list by clicking the name of the file in the File column. Press the Shift key and then select the last file by clicking the file name. This will select all the files between the first and the last selected files. Please note that this will not work if you use the checkboxes next to the file names to select files. Click files names instead to select files.
Download raw data using WebDAV
Files can also be downloaded using the WebDAV protocol. On Windows the raw data folder can be mapped as a network drive in Windows Explorer. Other WebDAV clients such as CyberDuck or WinSCP can also be used to connect to the folder.In the Download Data panel below the files browser in the Raw Data tab you will find the WebDAV URL (example screenshot below) along with the email address and password that is needed to connect to the folder.

Map folder as a network drive in Windows
- Copy the WebDAV URL displayed in the Download Data panel under the files browser in the Raw Data tab.
- On your computer open Windows Explorer. Right-click This PC in the left pane and select Map network drive from the menu.
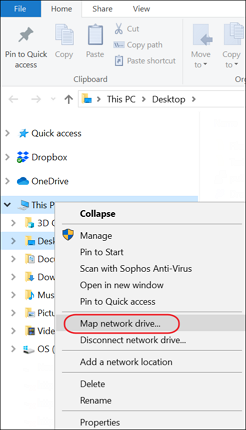
- In the Map network drive dialog enter the WebDav URL copied in step 1. Check Connect using different credentials and click Finish.
- When prompted for a username and password enter the email address and password from the DataPanel in the Raw Data tab and click OK.
This should map the folder as a network drive on your computer, and you should be able to copy down the desired files to another folder in Windows Explorer. Once you are done copying files you can disconnect the network drive by right-clicking the mapped drive and selecting Disconnect network drive from the menu. Please note that this works in Windows 10 and Windows Server 2016. If you have an older operating system and are unable to map a network drive with these steps then you can use a third party WebDAV clients such as CyberDuck and WinSCP.
CyberDuck (https://cyberduck.io/)
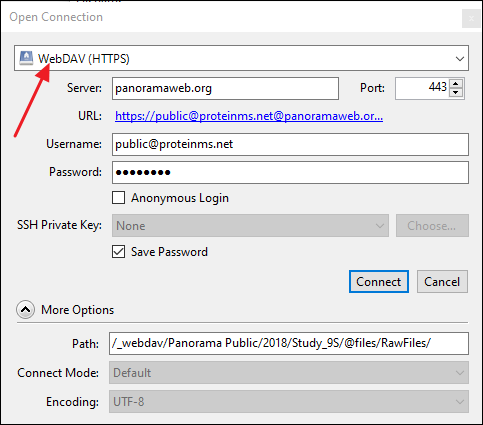
- Click Open Connection.

- In the Open Connection dialog select WebDAV (HTTPS) as the connection type.
- In the Server field enter the WebDAV URL copied from the Download Data panel in the Raw Data tab. CyberDuck will automatically parse the URL and populate the Path field.
- In the Username field enter public@proteinms.net.
- In the Password field enter panorama.
- Click Connect.
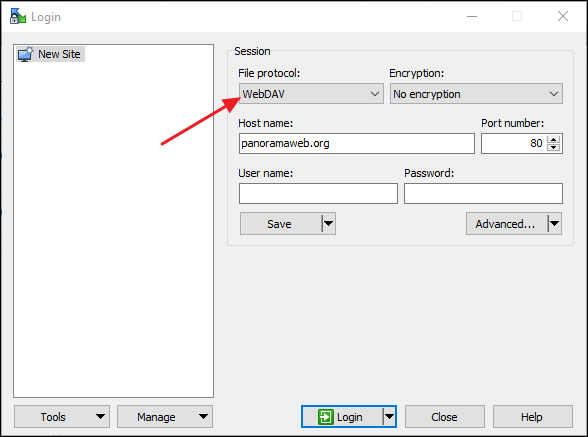
WinSCP (https://winscp.net/eng/index.php)
- In the Login dialog select WwbDAV under File Protocol.
- Copy the WebDAV URL in the Host name field. WinSCP will automatically parse the remote directory path from the URL, and you will only see "panoramaweb.org" in the field.
- Enter public@proteinms.net under User name.
- Enter panorama under Password.
- Click Login.
For options on OSX and Linux see this link: Native OSX and Linux WebDAV Clients